Creating Technical Rule
Let us get started by checking out how a Tenant’s user can create a Technical Rule. Any Tenant user can create a Technical or Business Rule.
Step 1. Click on the Add Rule icon & Select the Dataset Column(s)
On Clicking the plus icon (marked 2 in the image in the earlier section) in the ‘Technical View,’ the first screen of the modal workflow will display with the below fields.
| Fields / Inputs | Usage / Examples | Validation |
|---|---|---|
| Rule Name | Name of the rule (example: Customer name cannot be null) | 1. Required Field2. Checks if a rule with the same name already exists |
| Rule Description | Long text Description | Optional |
| Data Quality Dimension | Selection | Completeness, Uniqueness, Validity, Timeliness | 1. Required. No Other validation as such but please try to select logically. Example: ‘T_wo users can’t have same Id’_ rule probably fits Uniqueness more than Completeness |
| Data Set | The Data Set on whose column the rule is considered | 1. Required2. Only displays Active Data Sets to which user has at-least read rights |
| Column | The Data Set column from that Data Set against which the exceptions or quality will be measured. (aka ‘Primary Column’) | 1. Required2. Filters to the columns of the Data Set. |
We’ll take up the Fields related to ‘Flag an Exception when’ in Step 2.
System Validations
- No other validations other than the ones mentioned above.
Step 2. Provide the Exception Conditions
Fluree Sense provides for highly flexible rule creation with the provision of providing multiple AND or OR conditions in the exception section. The user provides the exception condition in the same first screen as in Step 1. but in a lower section marked in the image below.
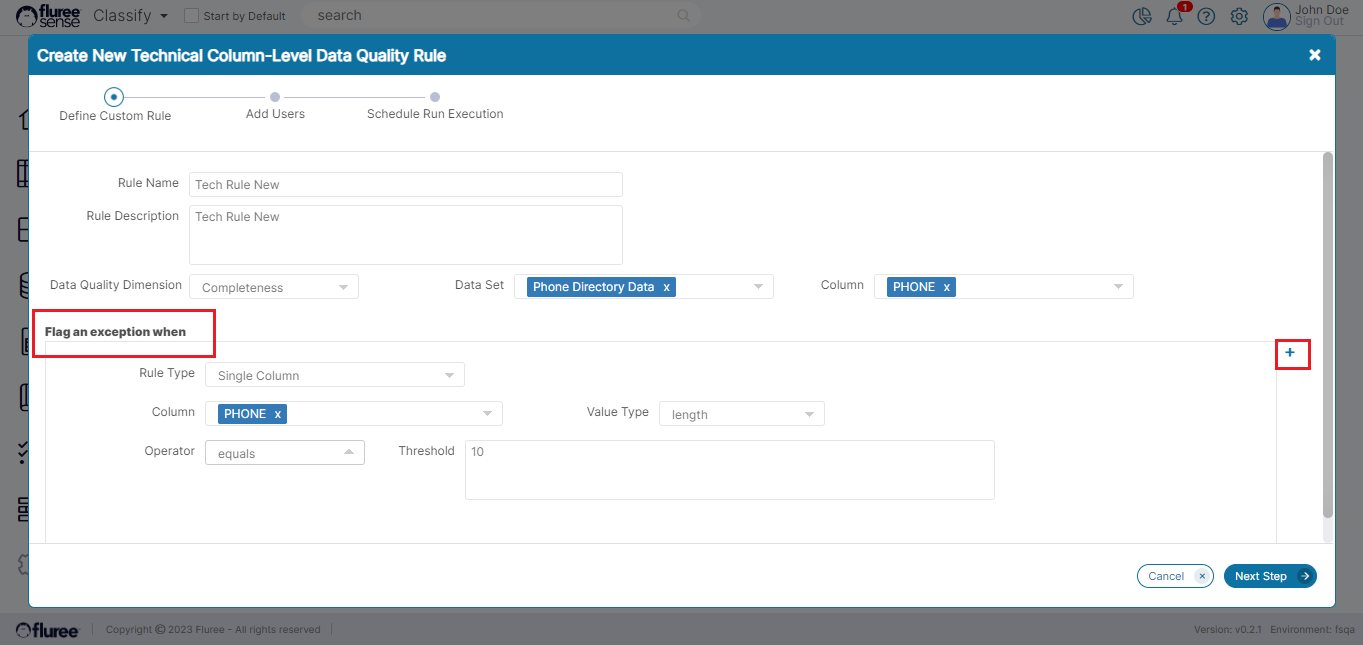
Each exception condition can have the following possible input/ field combinations:
| Fields / Inputs | Usage / Examples & Validations |
|---|---|
| Rule Type | 1. Single Column - used when rule condition is relevant to a single column2. Multi-Column - used when comparing more than one column3. Single Column Lookup Validations. Based on the Rule Type chosen, the Value Type and other fields change - for example for Multi-column: the display automatically changes to provide for 2 sets of Data Set & Columns. |
| Column (upper area above Exception conditions) | The difference between the Column in the upper section (mentioned in Step 1, aka ‘Primary Column’) of the screen and the Column in the exception section is that the first is the one against which the DQ score / stats will be counted whereas exceptions conditions may include multiple columns. Validations. At least, one of the exception conditions needs to have the primary column in it.Defaults to the column selected in the upper part of the screen (Step 1.) but can be changed. Filters to the Columns of the Data Set |
| Value Type | 1. value 2. length 3. regex 4. max 5. min 6. sum 7. average 8. product 9. Standard deviation, frequency, Precision 10. sum between, difference between and product between 11. custom calculation 12. datatype * Validations are listed in system validation section |
| Operator | 1. equals / does not equal3. is greater than / is less than4. is null/ is not null5. is greater than or equal to / is less than or equal to6. begins with / does not begin with7. ends with / does not end with 8. contains / does not contain9. between10. is Luhn / is not Luhn11. is within / is not within * Validations are listed in System Validations section |
| Threshold | Appears only in some combinations of rule type, value type and operator. Validations This is mandatory in most cases except in multi-column rule. |
| Next Step (Button) | Click ‘Next Step’ to save the inputs and move to the next step of workflow. – Validations Next Step remains disabled till all validations, required fields are completed - in any screen. |
Other than the input specific validations mentioned in the table above, the following needs to be considered:
System Validations
-
On pressing Next Step, the basic details of the rule get created in the system - even if all details are not yet filled and it is not ready for running. Thus a ‘draft’ of the rule gets created and even if you press Cancel in the next screen onward, you can come back later and complete the rule details in ‘Editing Rules’ which we’ll take up separately.
-
Following are some the validations required to be completed for Next Step to get enabled:
-
Fields such as Name, Dimension, Operator, Value Type are mandatory.
-
If Threshold field is shown for the Single Column rule, it is mandatory.
-
For the between operator (where applicable) – both lower and higher limit fields need to be filled.
-
If Exception Condition operator is -"is within" or "is not within" and the "Data set Name", "Data set Column" and "Filter" field appear, then the first two are mandatory.
-
If Rule Type is changed to Multi-Column or is multi-Column, then Column's value, Dataset Value, operator etc. need to be filled, and comparison Dataset and Column can't be empty.
-
At-least one exception condition is required but there can be multiple joined by AND or OR operator using the + icon which is marked in red in the image above.
-
Additionally in the Single Column Lookup type rule, Lookup Dataset and Lookup Column are mandatory.
-
If ‘Value Type’ is ‘Custom Calculations’ then a Custom Calculation textbox field appears and that is mandatory.
-
In the case of ‘Multi-Column,’ the operator field changes to only allow some specific option values relevant to a comparison operation.
Step 3. Add Users
The user which is logged-on is defaulted and required as Admin of the Rule (as only users with Admin rights are allowed to Add/Edit Users)
Any Rule needs at least one Rule Admin, which means that another Admin can remove the first.
The other role is that of Executor. An Executor is someone who can run the rule.
Useful Note: Whereas Admin and Executor roles have specific functionality, any user of the system can view exceptions generated by the rule.
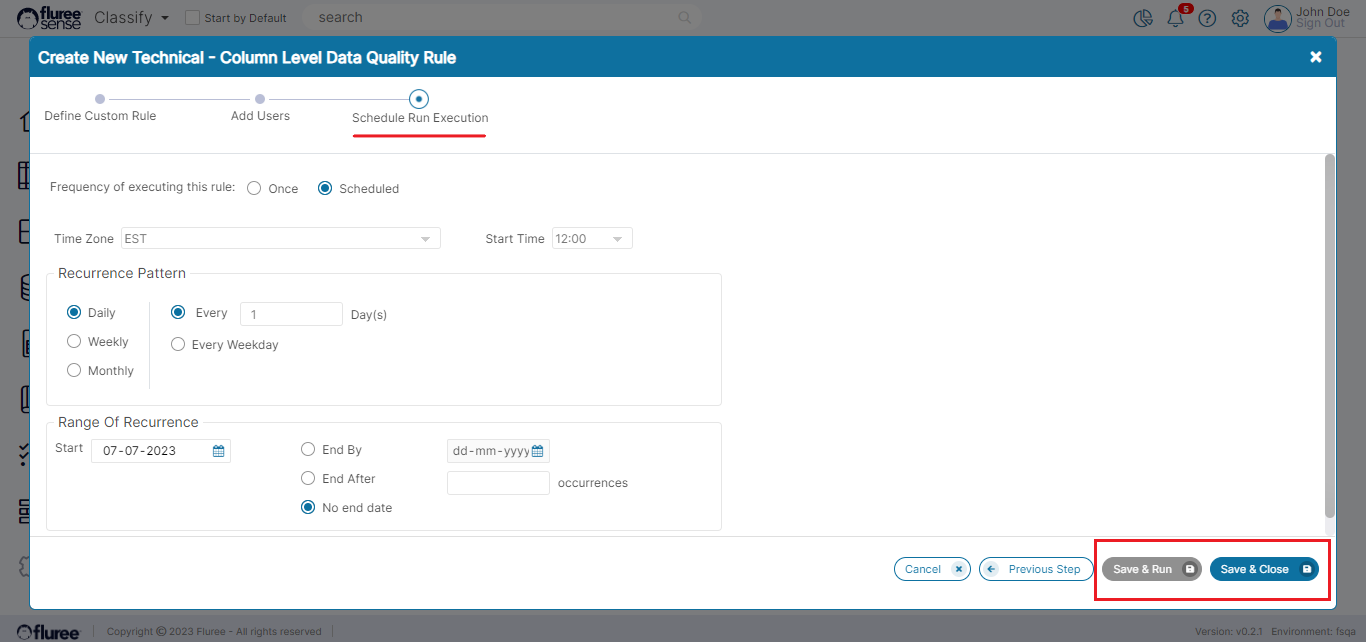
Step 4. Schedule Run Execution.
After clicking Next from the earlier screen, the user will come to the Schedule Run Execution screen. Here, the user will find two options - Once and Scheduled to begin with. The ‘Once’ option remains as the default one, which essentially means that if the user clicks the ‘Save & Run’ button then the rule will save and also run immediately just Once.
However, if the user selects ‘Scheduled,’ the lower area of the screen will display multiple other options as detailed below.
| Fields / Inputs | Usage / Examples | Validation |
|---|---|---|
| Frequency of executing | Once / Scheduled. Decides if the rule is executed on ad-hoc basis immediately with Save (Once) or executed as per a schedule (Scheduled). | Defaulted to Once. If ‘Once’ then none of the fields below are required or displayed. |
| Time Zone | Time Zones from across the world shown ranging from GMT to EST etc. to provide the zone for the Start Time | Mandatory field |
| Start Time | The Time (along with time zone) at which the rule will execute on designated day as per the ‘Recurrence Pattern.’ If the time has already passed, it will execute on the next execution date as per the cycle. | Mandatory field |
| Recurrence Pattern | Daily:(Every [n] Day) / Every Weekday Weekly: (Every [n] Week(s)) and checkboxes for days of the week provided. So, the User can choose one or more days of the week here. Monthly: Flexible options to decide [nth] day of the month or nth day of the week of the mth month (Example: 2nd Monday of every 3 Months) | Daily - Every 1 day is the default. User needs to choose Daily/Weekly/Monthly and then the recurrence cycle. System runs the rule as per the cycle. |
| Range of Occurrence | Start Date: End By / End After / No End Date: Radio button with a textbox is provided to fill in if either of the first two cases and the 3rd case (No End Date), just needs to be selected. | Start Date is Defaulted to current date and mandatory.Past Date cannot be chosen. |
| Save & Close (button) | This means just Save the rule and let it run as per schedule OR if it is a rule with ‘Once’ option, then whenever the user presses the Re-run Rule button – essentially in ad-hoc manner. | Will be enabled both for ‘Once’ and ‘Scheduled’ but for Scheduled it requires all mandatory fields of scheduling to be filled. |
| Save & Run (button) | This means saving and immediately running the rule. | Will not be enabled if the rule is of ‘Scheduled’ type. |
System Validations
- System validations specific to the input field groups and buttons are mentioned in the table above.